Quick answer
Steering knuckle replacement snapshot
A quick overview before we dive into the details.
$670 – $900
Higher on luxury & AWD vehicles.
7 / 10
Advanced: involves brakes, suspension and sometimes pressed bearings.
| Item | Low | Typical | High |
|---|---|---|---|
| Steering knuckle (bare) | $60 | $120 | $280+ |
| Knuckle w/ hub & bearing | $160 | $260 | $420+ |
| Labor (2–4 hours) | $220 | $400 | $560 |
| Alignment after repair | $100 | $150 | $220 |
For detailed costs and calculations, please check: Steering Knuckle Replacement Cost
Before you grab the tools
- Knuckle damage affects steering and braking.
- Cracks or bending mean replacement – not repair.
- Press‑fit bearings add difficulty to DIY jobs.
- Wheel alignment afterward is not optional.
- Driving with a bent knuckle is unsafe.
- Good jacks and torque wrench are mandatory.
Steering knuckle cost calculator
Rough estimate only – real prices depend on your vehicle, labor rate and parts brand.
What the steering knuckle actually does
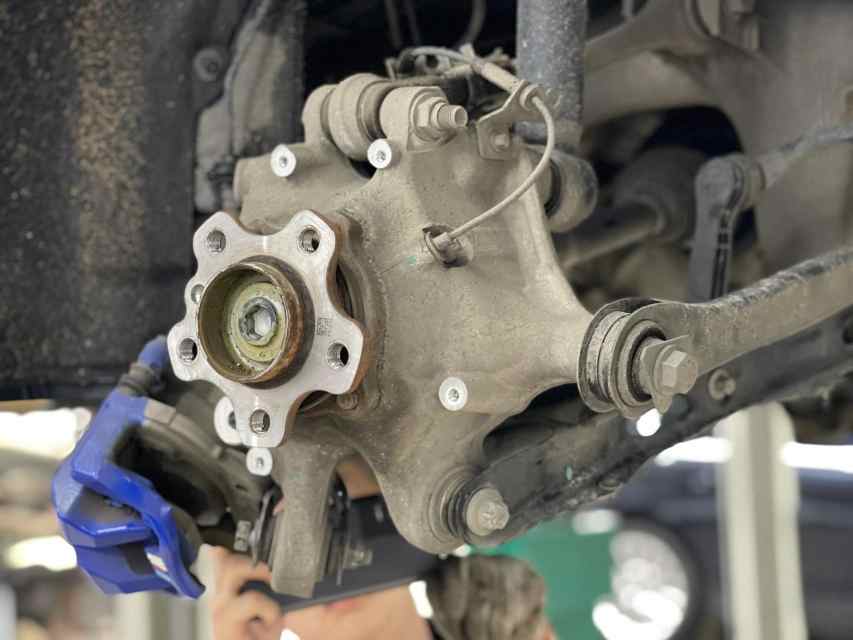
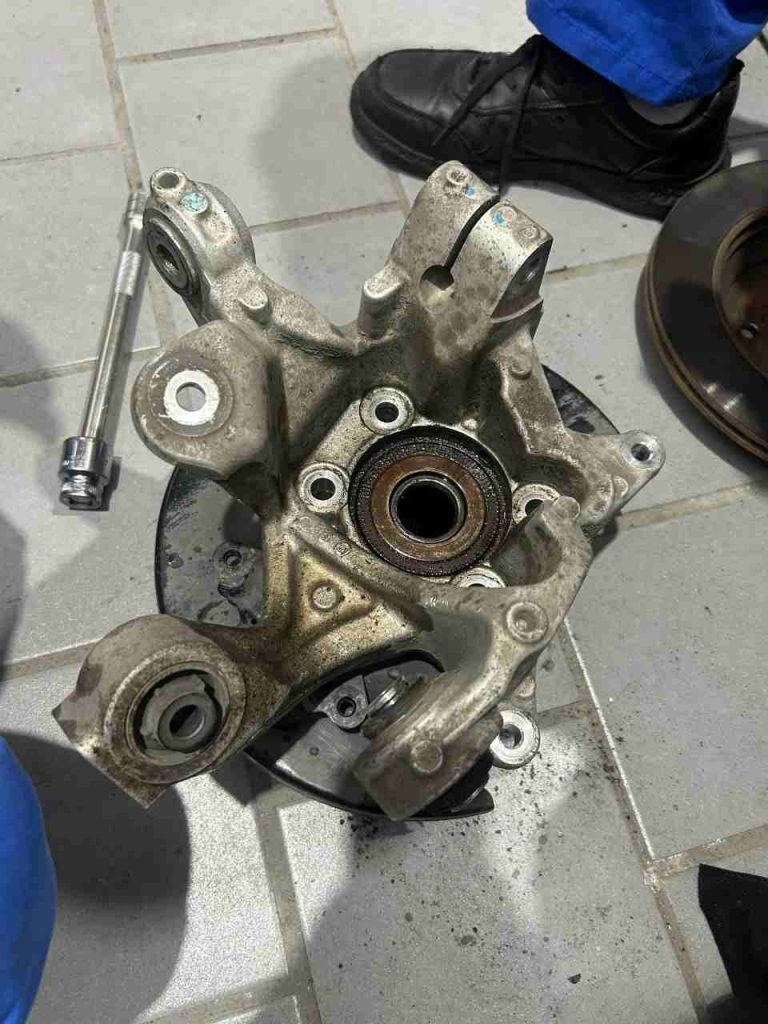
The steering knuckle (also called an upright, spindle or hub carrier) sits at the center of your front suspension. It
connects the wheel hub and bearing to the suspension and steering parts that let you turn and stop the car. A typical knuckle:
- Bolts to the strut or upper control arm at the top.
- Attaches to the lower control arm through a ball joint.
- Receives the outer tie rod end, so the wheel turns when you move the steering wheel.
- Holds the wheel bearing and hub in the center, where the wheel bolts on.
- Provides mounting points for the brake caliper bracket and sometimes the dust shield.
Any time you steer, brake or hit a bump, the steering knuckle is under load. If it’s cracked, bent or badly corroded,
wheel alignment and braking stability suffer – and in the worst case you can lose control of the vehicle.
brakes, suspension and torque specs, paying a professional is the safest choice.
Symptoms of a bad or damaged steering knuckle
Different problems appear depending on whether the knuckle is bent, cracked or worn where other parts attach.
Uneven or rapid tire wear
If one front tire keeps wearing on the inside or outside edge, even after a proper alignment, the steering knuckle
may be slightly bent. That subtle bend can push camber or toe outside the adjustment range.
Pulling or drifting to one side
A car that constantly pulls left or right on a straight, flat road can have an alignment problem caused by a distorted knuckle.
Tires and brake issues can cause similar behavior, so a full inspection is important.
Noises when turning or braking
Popping, clunking or grinding from the wheel area at low speed usually comes from worn ball joints, tie rods or wheel bearings.
But if the holes and tapers in the knuckle have worn out, those parts can move around more than they should and create noise.
Loose or shaky steering feel
If the steering wheel feels vague or fails to return to center normally, inspect the connection points where the tie‑rod
end and ball joints seat in the knuckle. Elongated or damaged mounting holes are not safe to reuse.
Visible damage or heavy rust
Cracks around the bearing bore, ball‑joint tapers or tie‑rod boss are all red flags. Likewise, deep flaking rust that has
begun to eat into the metal means the knuckle should be replaced, not cleaned up and reused.
When you really need to replace the steering knuckle
You should plan on replacement when you see any of the following:
- Cracks anywhere on the body of the knuckle.
- Bent or distorted mounting surfaces or bolt holes.
- A wheel bearing that cannot be removed without destroying the knuckle.
- Severe corrosion that has clearly thinned or weakened the metal.
- Accident or curb impact that obviously changed the knuckle’s geometry.
For light surface rust, cleaning and rust‑proofing are fine. But once the structural integrity or shape is in doubt,
there’s no safe “bend it back” fix at home. Replacement is the only reliable option.
DIY vs. professional replacement: which is right for you?
DIY might make sense if you:
- Already own a quality jack, jack stands and a torque wrench.
- Have successfully done brake jobs or suspension arms before.
- Can access a ball-joint separator, breaker bar and basic pullers.
- Are comfortable following a factory repair manual or trusted service data.
Consider a professional shop if you:
- Don’t have access to a press or hub-bearing service kit.
- Live in a rust belt region where bolts and joints are heavily corroded.
- Are uneasy working around compressed springs or heavy components.
- Have no easy access to a four-wheel alignment after the repair.
DIY readiness checklist
Tick what applies to you. This isn’t a test – just a reality check before you tear the car apart.
Step‑by‑step overview: how to replace a steering knuckle
Every vehicle is slightly different, so always follow the exact procedure and torque specs in your service manual.
The outline below gives you a realistic idea of what the job involves.
Preparation and safety
- Park on level ground, set the parking brake and chock the rear wheels.
- Loosen the wheel lug nuts slightly while the car is still on the ground.
- Jack up the vehicle, support it securely on jack stands and remove the wheel.
Remove the brake assembly
- Unbolt the brake caliper and hang it from the strut or frame – never by the hose.
- Remove the pads and caliper bracket if it’s a separate piece.
- Pull the brake rotor off the hub; some cars use small retaining screws.
Disconnect the tie‑rod end
- Remove the cotter pin and tie‑rod end nut.
- Use a puller or separator tool to pop the stud out of the knuckle without damaging the threads.
Separate the ball joint(s)
MacPherson strut suspensions usually have one lower ball joint; double‑wishbone setups may have an upper and a lower joint.
- Remove cotter pins and nuts from the ball‑joint studs.
- Use a ball‑joint separator or press tool to free the joints from the knuckle.
- Support control arms so they don’t snap downward when the joints release.
Detach the strut or upper mount
- Remove the large strut‑to‑knuckle bolts or the upper ball‑joint fasteners.
- Support the knuckle carefully so it doesn’t fall and strain ABS wiring or brake hoses.
Remove the axle (if applicable)
- Take off the axle nut with a breaker bar or impact gun.
- Push or press the axle splines out of the hub without mushrooming the threads.
- Support the axle so it doesn’t hang by the inner joint.
Remove the knuckle and swap parts
- Disconnect any ABS sensors or brackets and remove the knuckle from the vehicle.
- If the new knuckle doesn’t include a bearing and hub, press them over from the old one or install new components.
- Compare old and new knuckles side‑by‑side to confirm orientation and mounting points.
Install the new knuckle
- Refit the knuckle to the suspension in the reverse order of removal.
- Route ABS wiring and dust shields correctly so nothing rubs the rotor or tire.
- Tighten every nut and bolt to the specified torque using a torque wrench.
Reinstall brakes and wheel
- Reinstall the rotor, caliper bracket, pads and caliper.
- Confirm the brake hose isn’t twisted or pinched against the knuckle.
- Reinstall the wheel, lower the car and torque the lug nuts in a star pattern.
Alignment and final checks
- Schedule a four‑wheel alignment as soon as possible.
- Before highway driving, pump the brake pedal until it feels firm.
- Test steering and braking at low speed and listen for new noises.
Common mistakes to avoid
- Skipping torque specs. Guessing on critical fasteners can lead to loose parts or damaged threads.
- Reusing one‑time‑use hardware. Many axle nuts and some suspension bolts are torque‑to‑yield and should be replaced.
- Pressing a worn bearing into a new knuckle. If the bearing is noisy or has play, replace it while everything is apart.
- Neglecting alignment. Even if the car seems to drive straight, camber and toe can be far out of spec.
- Driving before checking the brakes. Any time you moved calipers or opened lines, confirm the pedal is firm and there are no leaks.
FAQ
Final thoughts
Steering knuckle replacement is an advanced repair, but not out of reach for a careful home mechanic with the right tools, accurate information and a healthy respect for safety. Whether you choose DIY or a professional shop, the priorities are the same: secure mounting points, correct torque, smooth wheel bearings and a proper alignment at the end.
If at any point you feel in over your head, it’s always okay to stop, reassemble what you can safely, and let a qualified technician take it from there. Suspension and steering are not the place to gamble.